(Angular Curriculum) Token Auth with JWTs Part 2 - Angular Setup
Warning: the code in this tutorial has been updated to reflect a better structure, but may come with some old references. Be ready to debug and fix any reference errors you may find while following along.
This is part 2 of a multi-part series on setting up an application with authentication with JSON Web Tokens. If you haven't been following along, please visit the other posts for a full understanding of the current project:
There's a lot to be done on the Angular/client side of things. Now that we've set up our server to save new users and pass a signed JWT back in a response to a successful /login API call, we need to actually do something with that token on the frontend! For that, we need to do the following:
- Create a basic Angular app with routing
- Add a user signup form and controller
- Add a user login form and controller
- Create some authentication services to handle dealing with user login, logout, and signup, as well as adding, getting, and removing the JWT to localStorage.
- Create an Http Interceptor to add a token to every outgoing request and to gracefully handle any
401 Unauthorizederrors that may come in from the server in case the user tries to get to a protected resource without logging in.
We've got a LOT of ground to cover, so let's get started!
Basic Angular Setup with Routing
Since we've already covered this stuff in the past, it will be easiest to get a basic project up and running by downloading this .zip file to get you started at a common baseline. Unzip the folder, which contains only the frontend boilerplate code, inside your project's root folder.
Understanding the Project Structure
The frontend part of this app you downloaded is organized as such:
public
    |_ app.js  # Main config stuff for our app
    |_ components/  # These are the main sections of the site
        |_ home/
            |_ home.html
        |_ todos/
            |_ todos.js
            |_ todos.html
        |_ navbar
            |_ navbar.html
    |_ index.html
We need to create a few folders and files to get ourselves ready for adding authentication to this app. Add the following to the public folder (items with "*" are the new folders/files):
public
    |_ app.js  # Main config stuff for our app
    |_ components/  # These are the main sections of the site
        |_ auth/*
            |_ login/*
                |_ login.html*
                |_ login.js*
            |_ logout/*
                |_ logout.js*
            |_ signup/*
                |_ signup.html*
                |_ signup.js*
            |_ auth.js*
        |_ home/
            |_ home.html
        |_ todos/
            |_ todos.js
            |_ todos.html
        |_ navbar
            |_ navbar.html
    |_ index.html
As it stands, the code in the .zip file won't fully function when you load the /todo route, since we set up our server to require a token for those resources and we haven't set up Angular to send the token yet.
Signup / Login
This should be a relatively straightforward one, since all we're really doing is creating a new user - no authentication required. However, as we've learned in the past about Angular, we should be performing all of our $http requests in Angular services instead of directly in the controller, so there'll be some setup we do now that we get to reuse when it comes time to log in.
Create auth module and token and user services
Under the components folder, create a new folder called auth and a file inside the new folder called auth.js. We're actually going to set this apart as a separate Angular module and inject it as a dependency into our main app.js configuration.
Inside this new module, we'll create services to handle the JWTs we get back from the server (simply saving, getting, and removing them to/from localStorage), as well as creating a service to help us signup, login, and logout.
// components/auth/auth.js

// Create a new Angular module called TodoApp.Auth
var app = angular.module("TodoApp.Auth", []);

app.config(["$routeProvider", function ($routeProvider) {
    $routeProvider
        .when("/signup", {
            templateUrl: "components/auth/signup/signup.html",
            controller: "SignupController"
        })
        .when("/login", {
            templateUrl: "components/auth/login/login.html",
            controller: "LoginController"
        })
        .when("/logout", {
            controller: "LogoutController",
            template: ""
        })
}]);

app.service("TokenService", [function () {
    var userToken = "token";

    this.setToken = function (token) {
        localStorage[userToken] = token;
    };

    this.getToken = function () {
        return localStorage[userToken];
    };

    this.removeToken = function () {
        localStorage.removeItem(userToken);
    };
}]);

app.service("UserService", ["$http", "$location", "TokenService", function ($http, $location, TokenService) {
    this.signup = function (user) {
        return $http.post("/auth/signup", user);
    };

    this.login = function (user) {
        return $http.post("/auth/login", user).then(function (response) {
            TokenService.setToken(response.data.token);
            return response;
        });
    };

    this.logout = function () {
        TokenService.removeToken();
        $location.path("/");
    };

    this.isAuthenticated = function () {
        return !!TokenService.getToken();
    };
}]);
Before we forget, let's include this file in our index.html and inject the new module as a dependency of TodoApp
<!-- index.html -->
...
<!-- Main App -->
<script src="app.js"></script>
<script src="components/todos/todos.js"></script>

<!-- Authentication -->
<script src="components/auth/auth.js"></script>
// app.js

var app = angular.module("TodoApp", ["ngRoute", "TodoApp.Auth"]);
UserService and TokenService give us the tools we need to signup and login, so let's create those components
Signup
In the components folder, create a new signup folder and 2 files inside the new folder, signup.html and signup.js.
components/auth/signup/signup.html
<div class="row">
    <div class="col-md-4 col-md-offset-4">
        <h1>Signup</h1>

        <form>
            <div class="form-group">
                <label for="name">Name</label>
                <input type="text" id="name" class="form-control" ng-model="user.name">
            </div>

            <div class="form-group">
                <label for="username">Username</label>
                <input type="text" id="username" class="form-control" ng-model="user.username">
            </div>

            <div class="form-group">
                <label for="password">Password</label>
                <input type="password" id="password" class="form-control" ng-model="user.password">
            </div>

            <div class="form-group">
                <label for="passwordRepeat">Repeat Password</label>
                <input type="password" id="passwordRepeat" class="form-control" ng-model="passwordRepeat">
                <span class="text-danger" ng-show="passwordMessage">{{passwordMessage}}</span>
            </div>
            <button class="center-block btn btn-primary btn-lg" ng-click="signup(user)">Signup</button>
        </form>
    </div>
</div>
components/auth/signup/signup.js
var app = angular.module("TodoApp.Auth");

app.controller("SignupController", ["$scope", "$location", "UserService", function ($scope, $location, UserService) {
    $scope.passwordMessage = "";

    $scope.signup = function (user) {
        if (user.password !== $scope.passwordRepeat) {
            $scope.passwordMessage = "Passwords do not match.";
        } else {
            UserService.signup(user).then(function (response) {
                $location.path("/login");
            }, function (response) {
                alert("There was a problem: " + response.data);
            });
        }
    }
}]);
###### Login
Similar to signup, create a new folder called login, and the associated html and js files inside that folder:
components/auth/login/login.html
<div class="row">
    <div class="col-md-4 col-md-offset-4">
        <h1>Log in</h1>
        <form>
            <div class="form-group">
                <label for="username">Username</label>
                <input type="text" id="username" class="form-control" ng-model="user.username">
            </div>

            <div class="form-group">
                <label for="password">Password</label>
                <input type="password" id="password" class="form-control" ng-model="user.password">
            </div>

            <button class="center-block btn btn-primary btn-lg" ng-click="login(user)">Login</button>
        </form>
    </div>
</div>
components/auth/login/login.js
var app = angular.module("TodoApp.Auth");

app.controller("LoginController", ["$scope", "$location", "UserService", function ($scope, $location, UserService) {

    $scope.login = function (user) {
        UserService.login(user).then(function (response) {
            $location.path("/todos");
        }, function (response) {
            alert(response.data.message);
        });
    }
}]);
Before moving on, we need to make sure to add these files as scripts in our index.html, so let's do that now:
...
<script src="app.js"></script>

<script src="components/todos/todos.js"></script>
<script src="components/auth/login/login.js"></script>
<script src="components/auth/signup/signup.js"></script>
Let's also alter the navbar to actually send us to these pages, so in navbar/navbar.html:
<li><a href="#/login">Login</a></li>
<li><a href="#/signup">Signup</a></li>
<li><a href="#/logout">Logout</a></li>
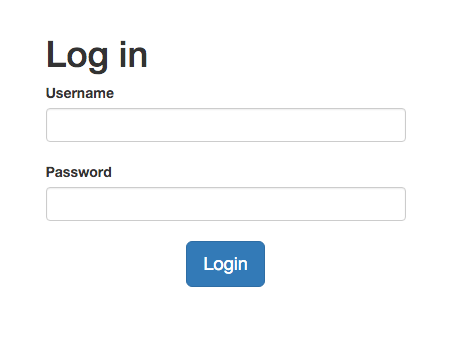
With that change, clicking "Login" should route to a page that looks like this:

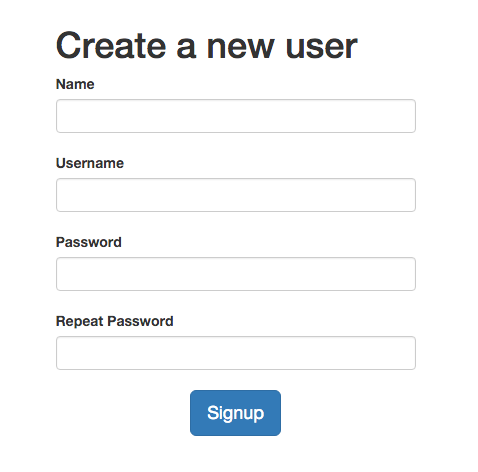
and clicking "Signup" should route to here:

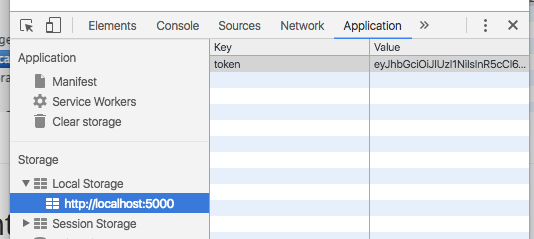
At this point you should be able to Signup as a new user, which should create that user in the database, which then should redirect you to a login screen. Open your developer tools and make sure when you log in with the same credentials you just provided that you're successfully receiving a token as part of the response. You can check the "Application" tab of the developer tools to see the token being stored in localStorage:

Http Interceptor
You might notice that upon successful login it is trying to redirect you to the /todos route, which tries to get a list of todos but fails authentication. This is because although we received a token from the server and saved it to localStorage, we're not actually sending it in the header of the request.
This is where we need to implement an Http Interceptor. It does exactly as the name indicates - it intercepts outgoing HTTP requests and incoming HTTP responses and can perform certain alterations to the request or response before it reaches its final destination.
Creating an interceptor will likely look a little foreign, but it is an ability built into AngularJS, and its format will look very similar across any interceptor you write.
We create a service with up to 4 methods on it - request, requestError, response, and responseError - which allow us to handle outgoing requests before they get sent, deal with errors in the request before it crashes something else, handle responses when they first come in, and deal with response errors before they crash something else in the app.
We'll put this code in our separate TodoApp.Auth module, in auth.js at the bottom:
// Below the app.service("UserService")... code block

app.service("AuthInterceptor", ["$q", "$location", "TokenService", function ($q, $location, TokenService) {
    this.request = function(config) {
        var token = TokenService.getToken();
        if (token) {
            config.headers = config.headers || {};
            config.headers.Authorization = "Bearer " + token;
        }
        return config;
    };

    this.responseError = function(response) {
        if (response.status === 401) {
            TokenService.removeToken();
            $location.path("/login");
        }
        return $q.reject(response);
    };
}]);

app.config(["$httpProvider", function ($httpProvider) {
    $httpProvider.interceptors.push("AuthInterceptor");
}]);
For now we won't worry about requestError or response.
This service gets pushed on to an array of interceptors that any HTTP occurrences must filter through before being sent or coming in. In every request, we're adding an Authorization header with the value of Bearer <token>, as expected by the server in order to authenticate our users.
If the server responds with a 401 Unauthorized error, we remove the token from local storage and send the person to the login page.
Our app is almost complete! We still need to add a way for our users to log out (we made a method in our UserService to do this), and we need to make the navbar display the "Login" and "Signup" links only when the user isn't logged in, and the "Logout" link only when the user is logged in.
Logout
While we could just put a function call in our navbar to call the UserService.logout method, for consistency's sake we're going to create a simple logout.js file with a LogoutController and its own route config. This should make finding this code easier for us or anyone else in the future, since it's consistent with the way login and signup were accomplished.
We already have our navbar routing the user to /logout when they click the "Logout" link, so let's handle that route. We aren't necessarily going to have a logout HTML page, so we'll just hook up a controller.
Add this to your logout.js file:
// components/auth/logout/logout.js

var app = angular.module("TodoApp.Auth");

app.controller("LogoutController", ["UserService", function (UserService) {
    UserService.logout();
}]);
...
<script src="components/todos/todos.js"></script>
<script src="components/auth/login/login.js"></script>
<script src="components/auth/signup/signup.js"></script>
<script src="components/auth/logout/logout.js"></script>
Navbar Directive
If you look back, we wrote a method in our UserService that lets us check if the current user isAuthenticated, which basically just checks if there is a JWT saved in local storage. We can use that method to control what gets displayed on our navbar.
Up until now we've been associating Controllers with HTML pages through the $routeProvider code in each component's .config block. Instead of creating a whole separate route and controller for the navbar (which doesn't really make sense, since it will be shared across all routes), we're just going to create a new navbar directive, point it to the current navbar's HTML, and write some JavaScript logic to control how it looks.
Add a new file in components/navbar called navbar.js and add the following to it:
// components/navbar/navbar.js

var app = angular.module("TodoApp");

app.directive("navbar", ["UserService", function(UserService) {
    return {
        templateUrl: "components/navbar/navbar.html",
        link: function(scope) {
            scope.userService = UserService;
        }
    }
}]);
The link function sets up a new $scope variable ($scope.userService) which gives us access inside the navbar directive to execute any methods of the UserService itself. In a bit we'll change the navbar to execute the isAuthenticated() method on the UserService through this new $scope variable.
Add this new JavaScript file to index.html
<script src="components/navbar/navbar.js"></script>
and while you're here, replace the current line:
<div ng-include="'components/navbar/navbar.html'"></div>
with our new directive:
<navbar></navbar>
The last thing to do is to add ng-show and ng-hide to the Login, Signup, and Logout links in navbar.html based on the value of isAuthenticated:
<!-- components/navbar/navbar.html -->

<li ng-hide="userService.isAuthenticated()"><a href="#/login">Login</a></li>
<li ng-hide="userService.isAuthenticated()"><a href="#/signup">Signup</a></li>
<li ng-show="userService.isAuthenticated()"><a href="#/logout">Logout</a></li>
Now when the user is logged in, the navbar should display "Logout", and when they aren't logged in it should display "Login" and "Signup"!
Conclusion
That's the basic setup for successfully handling authentication on the AngularJS side of your application! You've come a LONG way, and now your frontend app can display just one specific user's information, can log in, log out, sign up new people, save and remove JWTs, all of which happens behind the scenes and create a seamless experience for the user.
There's a TON more that you can add to your app, including Facebook/Google/Twitter/whatever authentication, the requirement to send an email to verify a new signup, the ability to let the user change a password and handle forgotten passwords or usernames, not the mention all the basic functionality like creating new Todo items, checking them as done, maybe sharing a list with someone else, and so much more. These are all out of the scope of this tutorial and include lots more backend code as well, but we definitely encourage you to try different things and learn best practices.
There's one last main security flaw we need to deal with, so let's quickly take care of that in the next part of the series - Token Auth with JWTs Part 3.
